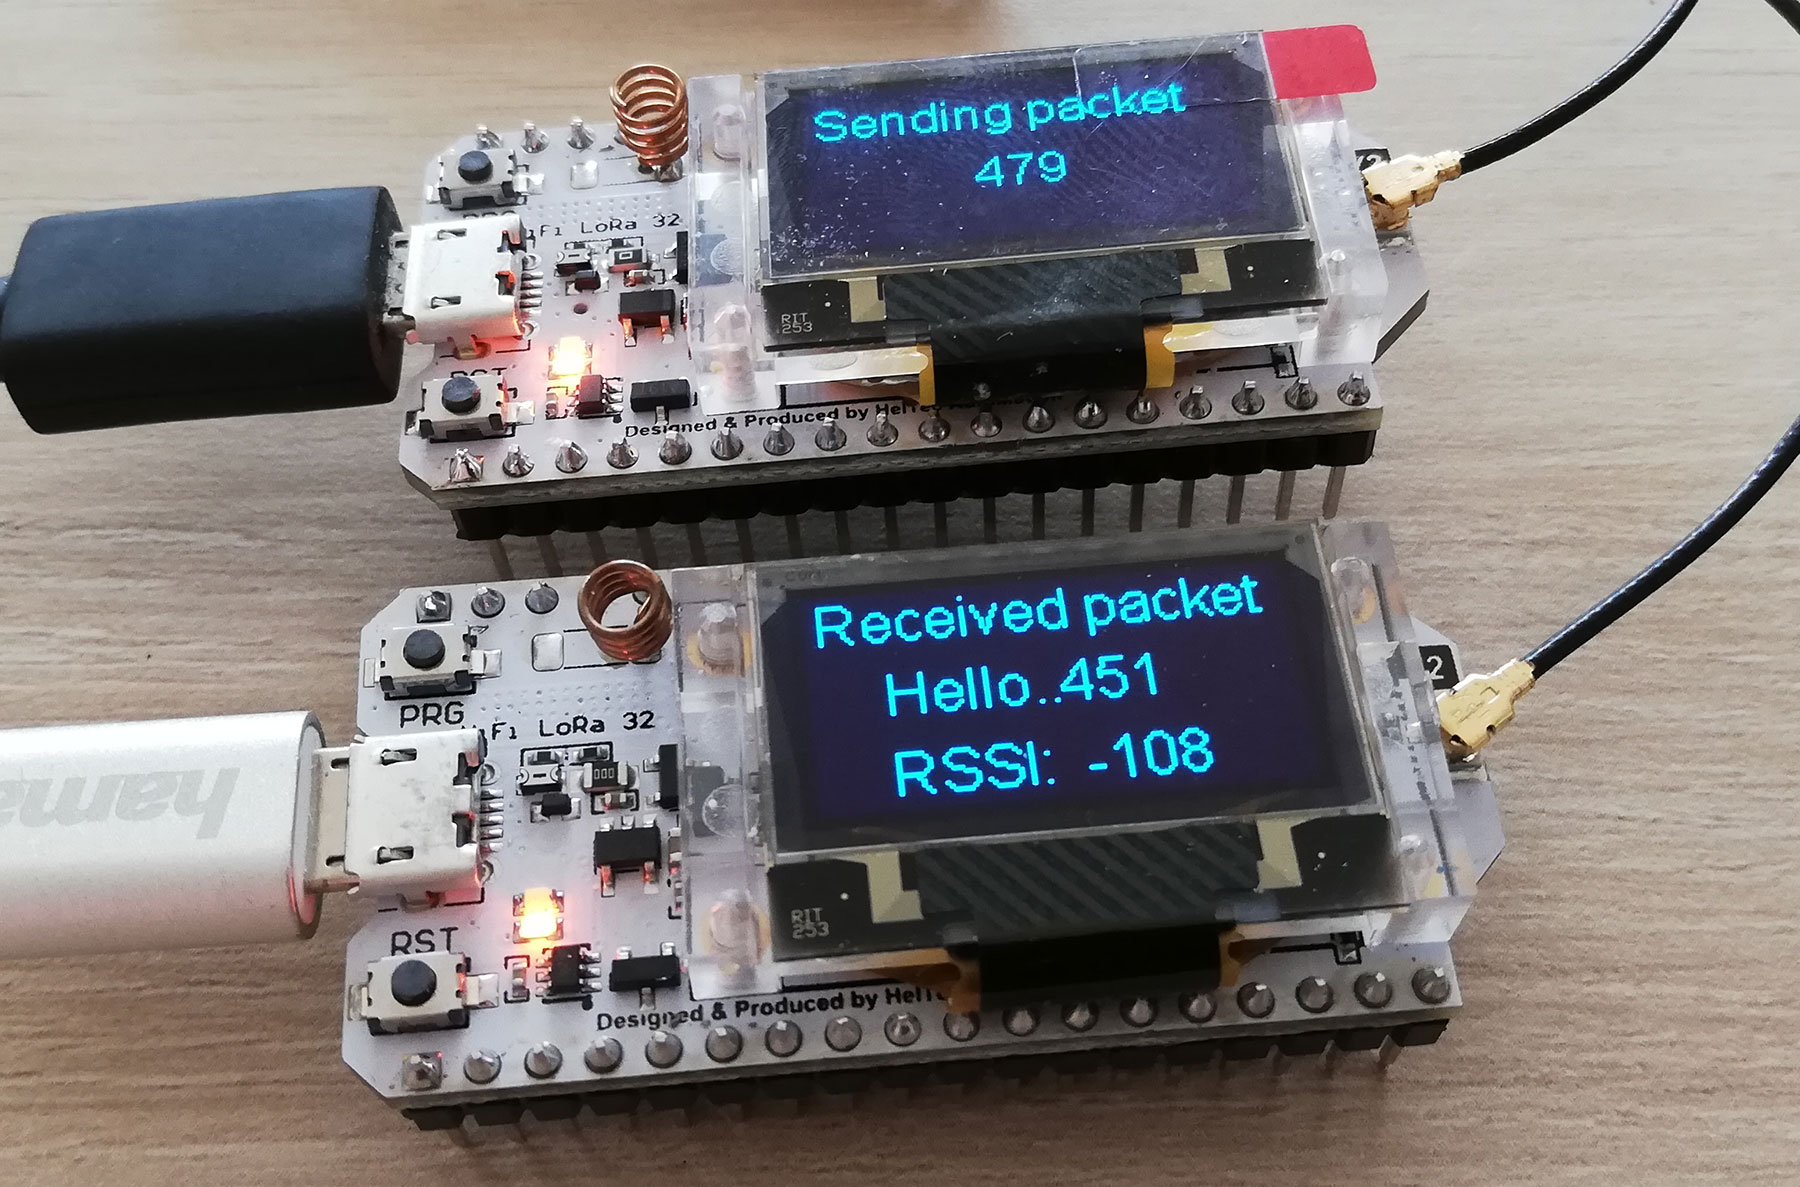
Sending data over LoRa with Heltec ESP32 WifiKit. Having two ESp32 boards, the first test that come in mind is to send some packets!

Remember to connect the antenna to the board, as the producer reccomends, to avoid damage on the SX127x chip.
Make sure that you have set the ESP32 board in Arduino IDE. Look on internet or this article.
Next step, install heltec, LoRa (from Sandeep Mistry) and SSD1306 (from Daniel Eichhorn) display libraries:


The program for testing is sourced from alictronix.
Sender program
//https://www.alictronix.com/archives/860
#include <SPI.h>
#include <LoRa.h>
#include "SSD1306.h"
#include<Arduino.h>

//OLED pins to ESP32 GPIOs via this connecthin:
//OLED_SDA -- GPIO4
//OLED_SCL -- GPIO15
//OLED_RST -- GPIO16

SSD1306  display(0x3c, 4, 15);

// WIFI_LoRa_32 ports
// GPIO5  -- SX1278's SCK
// GPIO19 -- SX1278's MISO
// GPIO27 -- SX1278's MOSI
// GPIO18 -- SX1278's CS
// GPIO14 -- SX1278's RESET
// GPIO26 -- SX1278's IRQ(Interrupt Request)

#define SS      18
#define RST     14
#define DI0     26
#define BAND    433E6  //915E6

int counter = 0;

void setup() {
  pinMode(25,OUTPUT); //Send success, LED will bright 1 second
  pinMode(16,OUTPUT);
  digitalWrite(16, LOW);    // set GPIO16 low to reset OLED
  delay(50);
  digitalWrite(16, HIGH);

  Serial.begin(115200);
  while (!Serial); //If just the the basic function, must connect to a computer
  // Initialising the UI will init the display too.
  display.init();
  display.flipScreenVertically();
  display.setFont(ArialMT_Plain_10);
  display.setTextAlignment(TEXT_ALIGN_LEFT);
  display.drawString(5,5,"LoRa Sender");
  display.display();

  SPI.begin(5,19,27,18);
  LoRa.setPins(SS,RST,DI0);
  Serial.println("LoRa Sender");
  if (!LoRa.begin(BAND)) {
    Serial.println("Starting LoRa failed!");
    while (1);
  }
  Serial.println("LoRa Initial OK!");
  display.drawString(5,20,"LoRa Initializing OK!");
  display.display();
  delay(2000);
}
void loop() {
  Serial.print("Sending packet: ");
  Serial.println(counter);
  display.clear();
  display.setFont(ArialMT_Plain_16);
  display.drawString(3, 5, "Sending packet ");
  display.drawString(50, 30, String(counter));
  display.display();
  // send packet
  LoRa.beginPacket();
  LoRa.print("Hello..");
  LoRa.print(counter);
  LoRa.endPacket();
  counter++;
  digitalWrite(25, HIGH);   // turn the LED on (HIGH is the voltage level)
  delay(1000);                       // wait for a second
  digitalWrite(25, LOW);    // turn the LED off by making the voltage LOW
  delay(1000);                       // wait for a second
  delay(3000);
}
Receiver program
#include <SPI.h>
#include <LoRa.h>
#include "SSD1306.h"

SSD1306  display(0x3c, 4, 15);

//OLED pins to ESP32 GPIOs via this connection:
//OLED_SDA -- GPIO4
//OLED_SCL -- GPIO15
//OLED_RST -- GPIO16
// WIFI_LoRa_32 ports
// GPIO5  -- SX1278's SCK
// GPIO19 -- SX1278's MISO
// GPIO27 -- SX1278's MOSI
// GPIO18 -- SX1278's CS
// GPIO14 -- SX1278's RESET
// GPIO26 -- SX1278's IRQ(Interrupt Request)

#define SS      18
#define RST     14
#define DI0     26
#define BAND    433E6

void setup() {
  pinMode(16,OUTPUT);
  digitalWrite(16, LOW);    // set GPIO16 low to reset OLED
  delay(50);
  digitalWrite(16, HIGH);
  display.init();
  display.flipScreenVertically();
  display.setFont(ArialMT_Plain_10);
  display.setTextAlignment(TEXT_ALIGN_LEFT);

  Serial.begin(115200);
  while (!Serial); //if just the the basic function, must connect to a computer
  delay(1000);
  Serial.println("LoRa Receiver");
  display.drawString(5,5,"LoRa Receiver");
  display.display();
  SPI.begin(5,19,27,18);
  LoRa.setPins(SS,RST,DI0);

  if (!LoRa.begin(BAND)) {
    display.drawString(5,25,"Starting LoRa failed!");
    while (1);
  }
  Serial.println("LoRa Initial OK!");
  display.drawString(5,25,"LoRa Initializing OK!");
  display.display();
}
void loop() {
  // try to parse packet
  int packetSize = LoRa.parsePacket();
  if (packetSize) {
    // received a packets
    Serial.print("Received packet. ");
    display.clear();
    display.setFont(ArialMT_Plain_16);
    display.drawString(3, 0, "Received packet ");
    display.display();
    // read packet
    while (LoRa.available()) {
    String data = LoRa.readString();
    Serial.print(data);
    display.drawString(20,22, data);
    display.display();
    }
    // print RSSI of packet
    Serial.print(" with RSSI ");
    Serial.println(LoRa.packetRssi());
    display.drawString(20, 45, "RSSI:  ");
    display.drawString(70, 45, (String)LoRa.packetRssi());
    display.display();
  }
}
Upload the code to each board, and then wait for results:


Happy blinking!
Heltec WiFi 32 board


Recomended tools:


Air quality sensors:


ESP32 lora send/receive packet test
Hello. thanks for all the information available. I have a question. is there a function in the library that allows us to confirm that the message has been delivered? Or it is up to us to implement a callback confirming the integrity of the message. Or any other technique that allows the recipient to confirm that every message has been received. So let the sender know that everything is ok. does this have to be implemented by us?
this messages are not like in TCP protocol, more likely as UDP: the packet is sent without waiting for a confirmation
An excellent article, I read many articles on this topic and tried various sketches, it does not work, I thought that the module was out of order and then I came across your article. Thank!
Hello, a question that goes well with the name of your site: How do you get Lora.print() to understand an escaped ” character??
Let’s say I want to send ‘hello “you”‘, then I’ve tried Lora.print(“hello \”you\””), but on the receive side, it really receives the backslash and the doublequotes, and it will print ‘hello \”you\”‘ instead of ‘hello “you”‘.
Hi Dear
if i want to connect water turbidity sensor to one of the Heltec ESP32 WifiKit (Sender) and sens its reading to the other Heltec ESP32 WifiKit (Receiver), on what Pin should i connect the sensor data pin? and what should i change in the above two code? Please.
Best Regards